Showing posts with label art project. Show all posts

Saturday, June 23, 2012

Melted Crayon Art Blocks

I got this cool idea from The Artful Parent blog and thought it would be fun to give it a try with the girls. I warmed our blocks in a toaster oven then let the girls melt crayon designs all over them. Lastly we painted over the crayon with liquid water colors.


Thursday, February 11, 2010

Hand Made Valentines


I love Valentines Day and I love making hand made Valentines with my girls. This year we used a method I found over at Let's Explore. You can find it here. It is a print making technique that is super easy and fun for kids to do. This is how it is done:


We used a small cookie sheet that I picked up at the dollar store and placed masking tape on it to mark out the size of our print. Using acrylic paint and a sponge brush my girls covered the area inside the square as carefully as possible with the paint. If we got paint outside of the square we just used a damp sponge to clean it off.

Next using a Q-tip the girls made a design in the paint. Then we took our card stock, placed it on top of the paint and pressed down hard. There you have it - a one of a kind print on each card! We found that each application of paint made about 2 cards.


Now for the extra fun part. Using glitter glue I let the girls go crazy decorating around the prints. This was messy but FUN!!!


Here are just a few of our finished products. We ended up having to make almost 70 cards!!! We have a lot of Valentines this year :)


Saturday, January 9, 2010

Color collage

While the only male in our house watched basketball today, the girls and I cut up magazines. Anytime we can use scissors and glue in this house we are all pretty happy. After we cut for quite some time and the floor became covered in little specs of leftover paper, we then assembled some collages - always a classic activity. I tried a new twist on it today though to add a little more challenge to the process - choosing one color. I encouraged the girls to only cut out pictures that were in one color scheme and then see what they looked like all together as a collage. Here are our results:


Tuesday, December 1, 2009

2009 Advent Calendar


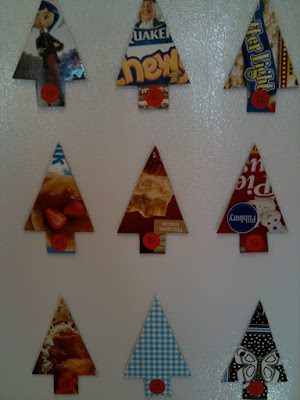
Each year I like to make a new advent calendar for my kids. This year I decided on a service based calendar made out of recycled boxes. Here is how to do it:


1. First collect food boxes, postcards, dvd covers, or anything else made out of stiff paper or cardboard that you would otherwise dispose of.


2. Use an X-acto knife to cut 25 christmas tree shapes out of the recycled cardboard


3. Turn them over and write one service your child can perform each day. Some Examples include:

Tell someone you love them
Clean your room
Compliment 3 people
Take food to the food bank

Next place sticky backed magnet pieces (you can purchase a strip of these at the craft store) on the back of each tree


4. Place a round sticker on the front of each tree. Write one number up to Christmas Day (25th) on each sticker.


5. Place all trees on your refrigerator and have the kids turn the appropriate one over each day. They are sure to end up on Santa's good list if they complete all of the tasks!!!


Sunday, November 15, 2009

20th Street Art


We took the kids to 20th street art gallery today up in Sacramento. It was the 2nd Saturday Art Walk and this gallery was having a reception for their 20/20 show.


Each artist created 20 small panels for this exhibit. Coco's preschool teacher was one of the many talented artists who had pieces in the show. We were all excited to go and see her work. Here are a few examples of the art:

This is Ms. Setsuko's work

Loved these, they used a pointillism technique

My girls were into the butterflies

This is a great show for kids to attend. It was extremely engaging and it opened the door for a little art of our own. When we got home we each attempted our own 20/20 projects but on a smaller scale. Here are our results:


Saturday, November 14, 2009

Simple Fall Leaf Projects

Here are a few simple fall leaf projects we like to do around here each year:
1. Leaf People
This is as simple as collecting leaves, pressing them in some large books for a few days, glueing them to paper and then using a pen and your imagination to turn them into any kind of creature you want!
s


2. Leaf Stamps
Yet again very simple. We used glittery squeeze paints to cover the leaves then we stamped them on paper. Easy and fun!


Wednesday, November 11, 2009

Last Minute Rainy/Crazy Day Activity


I keep a box of easy to use craft supplies in our loft above our garage. I purchase them as I see them and then tuck them away for a rainy day (or a I'm going crazy day) activity. Recently I had such a day and even though it was sunny and nice out I still had to pull from my go to box because we were all going a little crazy around here. My girls went nuts with these few simple supplies that I put out:

Foam in the shape of heads
Yarn
Glue
Googly Eyes
Markers
Popsicle sticks

They proceeded to make a head puppet replicating each of their friends at school and then went on to create a puppet show. Lucky me, not only did I get to take in a matinee show but I also was able to avoid an afternoon of fighting and melt downs while we waited for Dad to come home.


Sunday, October 25, 2009

Vegetable printing


When I was a little girl my mom was full of great craft ideas. One activity I remember doing with her was potato printing. We would get out all of our unusable potatoes (those that were so old they were sprouting) cut them up, dab them in some paint and stamp away. I thought it was time I did this with my girls but with a few variations. Upon looking on line I found a ton of sites with all kinds of great printing ideas. One of my favorites was using corn on the cob, rolling it through the paint and then onto the paper - genius! You can click here to see the blog were I found this idea (Make sure to scroll all the way down). Another inspiration was this blog with some wonderful potato prints.
On the day of our print making the girls and I stopped by the grocery store on the way home from school and picked out fruits and vegetables that we thought would make an interesting print. Then we headed home set up camp in the back and got to work. Here is what we came up with:


To get the different shapes we used cookie cutters on the potatoes


Corn on the Cob

This one was done with oranges


Jack -O- Lantern!!! All it took was an apple and a knife to do the carving


Happy Printing!!!

Thursday, October 22, 2009

Andy Warhol Project


My daughter came home with this lovely piece of art from preschool yesterday. We have been extra lucky this year with her teacher who also happens to be an artist. Each day she excitedly tells me about each new art project that they are working on in great detail. Her teacher insists on using high quality mediums and explores different techniques with the children constantly. Not only do I get lovely pieces to frame in our house but I also get amazing ideas that we can continue to play with at home - I love it!!!! Here is an Andy Warhol inspired piece that I especially like:

Photoshop was used to print up the original pictures then the children used their imaginations to doctor each one up in a different way. So what do you think? I say it is just as good as one of Andy's original - although I might be a little biased :)